1 Oct 2006

Paper Covered Wire Stems

I've had a few enquiries about where to get the paper covered wire used to make the flower fairies, in the UK. I will try to find the invoice from the purchase I made and pass on the details.

In the meantime, I believe that cook shops which sell cake decorating or sugar craft ingredients should either have these paper covered wires in stock or at least be able to order them in for you.

Alternatively, if you Google 'Klutz' you should find the main supplier of Klutz Craft books and kits in the UK. I know they produce a refil pack for the flower fairy kit so you could get some wires that way. Hope this helps.

In the meantime, I'll keep looking for my original receipt and I'll post the details of the shop on this blog when I do.

Bernie

31 Jul 2006

How to make a flower fairy (amended)

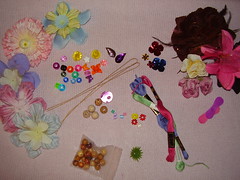
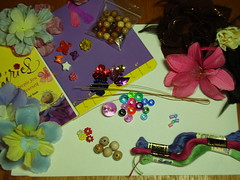
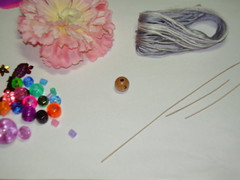
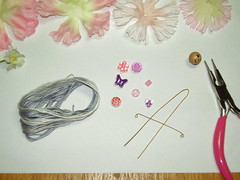
Here is a selection of items that you will need to make flower fairies: Silk flowers, paper covered wire, wooden beads, sequins, beads, embroidery thread or floss. You will also need a permanent marker, round nose pliers and some strong pva glue.

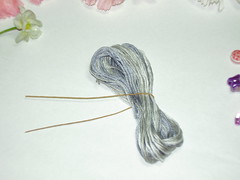
Paper-covered wire can be bought from cook shops & florists. The paper has a tendency to unravel so you need to dip the ends into pva glue when you cut them. Cut the wire into two lengths – one piece into a 6½” length and one piece into 2½” length.

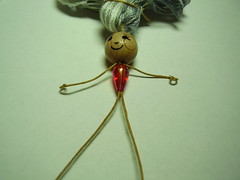
I have used size 13mm wooden beads, which I varnished with some craft varnish/glaze. I used a permanent marker to draw on the fairy faces. You could also use a colouring pencil to draw the faces on unvarnished beads.

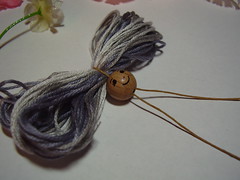
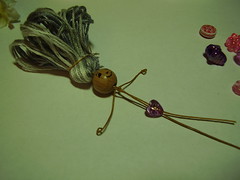
Using your round nose pliers, or a cable needle, curl under a small piece of each end of the short wire to make the hands. Take some embroidery thread and wind it around your fingers about 10 times to create the hair.

I have mixed grey, blue and light blue threads together to add texture. You can also use boucle, mohair and other fancy yarns instead of embroidery thread/floss. Bend the longer length of wire in half and catch the hair in the bend.

Feed the wire through the hole in the wooden bead and push the bead right up to the hair.

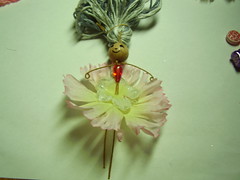
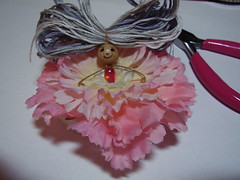
Pull the hair out of the way with a piece of scrap thread or wire. Attach the arms to the body by placing it horizontally below the head. Fold or twist the arms into place. Feed on a decorative bead for the body.

You can try out different beads: heart or teardrop shaped beads make pretty bodies. You can also add beads to the arms to make ‘puffy’ sleeves to match the bodice of the dress. Use your imagination.

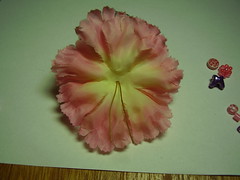
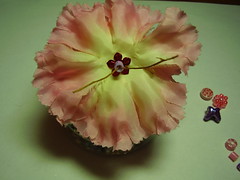
Add the silk flower petals, starting with the smallest: feed both legs through the hole in the flowers until you have added enough to make a pretty skirt. The more petals you add the fuller the skirt. I have used carnation petals here.

As you add each petal, you can also add a dab of glue between the layers to help keep them in place. This is a view of the underskirt with the legs peeping through.

This is optional but it adds a nice finishing touch to the underskirt of the fairy. Push a sequin onto the legs, right up to the petal skirt and glue in place. Add a hama bead, feeding both legs through, and glue.

Using the round nose pliers, curl under the bottom of the legs to make the feet. Or, you can add a teardrop bead for feet and bend the wire to secure in place. All that’s left is to style the hair and add props.

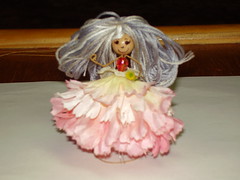
And here she is – the finished fairy!

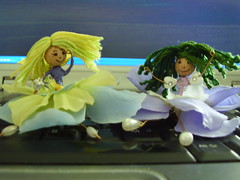
These two fairies have bodies made using embroidery thread. I took a length of thread and tied it to the body. Then, I wound it up the body, around the shoulders and back down. If you prefer, you can wind it along the arms (for sleeves) and then back down the body – as with the yellow fairy.

7 Jul 2006

Flash YOUR Flower Fairies

I hope that you find the information on the fairy blog helpful. If you do get round to making some fairies, let me know. I would love to see how you get on.

I have set up a section in the sidebar where I will post links to your pictures of fairies. So share them with the world. Flash your flower fairies here!

Have fun!

Toodles.

Small flower fairy in a pot

So many people having babies at the moment every where I look. Here's a nice little idea for a parcel embellishment or small gift:

Take a small silk rose bud and gently open the petals slightly. Pop in a small wooden bead with sleepy eyes drawn on and glue in place.

If the bud has a wire stem, wind it around a skewer to give it some curly twists, add a ribbon bow and stick onto the baby's gift.

Alternatively, cut the stem off, place the bud into a very small terracotta pot (you can leave the pot in its natural state or paint in pastel colours) and glue bud into base of pot. Use this to decorate or embellish a present. Or better still, wrap the whole thing in cellophane with a bright ribbon and give as an additional gift.

I'll see if I can find one in my craft box and will post a picture when I get a chance. I think they look soooo sweet!

28 Jun 2006

How to make a flower fairy (preview)

I have had a number of enquiries on how to make these beautiful flower fairies. I will be posting instructions on this site in the next 24 hours or so. In the meantime, I can recommend two great books:

1) Petal People You Make Yourself (Klutz) - comes with 'ingredients' to get you started. You can also get mini kits to make flower ballerinas, angels and fairies. For UK enquiries, if you Google KLUTZ you'll find the main online shop for KLUTZ products in the UK.

2) Fairy Crafts by Heidi Boyd (David & Charles) . Full of flower fairies and lots of other fairy goodies.

14 May 2006

Pippy Flower Fairy

Here she is - my favourite flower fairy. She kind of reminds me of Pippy Long Stockings. I must however apologise for the quality of the photos. They didn't come out as sharp as I wanted. I hope you enjoy them anyway.

Many thanks as usual to you all for looking. Best wishes...Bernie

Moulin Rouge Flower Fairy


She's red, she's hot, she's racey, she's a ..... teeny weeny little flower fairy sitting in the garden. Where have her friends gone......

Pom Pom Flower Fairy

I made this fairy when my daughter was part of a baton twirling group a couple of years ago. I'm sorry the picture quality is so poor. I'm not the best camerawoman in the world. Enjoy anyway.

Thanks again for looking

Bernie


1 May 2006

Fairy stuff update

Hi there -

please come back in a couple of days to see examples of my flower fairies and what I use to make them.

Thanks for looking.

Bernie